DIY Extractor Fan Feasibility Checker
Step 1: Check Your Current Power Source
Look at your existing extractor fan. How is it connected to electricity?
Plug-In Model
Has a standard plug that goes into a socket.
Hardwired Unit
Connected directly to wires (Live/Neutral/Earth).
Step 2: Assess the Ventilation Path
Where does the air currently go, and what do you want for the new unit?
Step 3: Installation Complexity
Check all scenarios that apply to your specific situation:
Why this recommendation?
Safety Checklist Before You Start
Grease buildup and motor wear eventually turn your kitchen extractor fan, also known as a range hood, into a noisy, inefficient appliance. When it fails completely, you face a choice: call an electrician or tackle the job yourself. The short answer is yes, you can replace most kitchen extractor fans yourself, provided you have basic DIY skills and understand local safety rules.
In Auckland and across New Zealand, home improvement projects are common, but they come with strict electrical standards. This guide walks you through exactly what you need to know before you start, helping you decide if this is a weekend project for you or a job that requires a licensed professional.
Key Takeaways
- Safety First: Always isolate power at the switchboard before touching any wiring.
- Know Your Limits: Simple plug-in models are easy swaps; hardwired units may require a licensed electrician under NZ regulations.
- Measure Twice: Cutout dimensions and ducting sizes vary significantly between brands like Miele, Bosch, and budget options.
- Ducting Matters: Directing air outside is far more effective than recirculating it through charcoal filters.
Assessing Your Current Setup
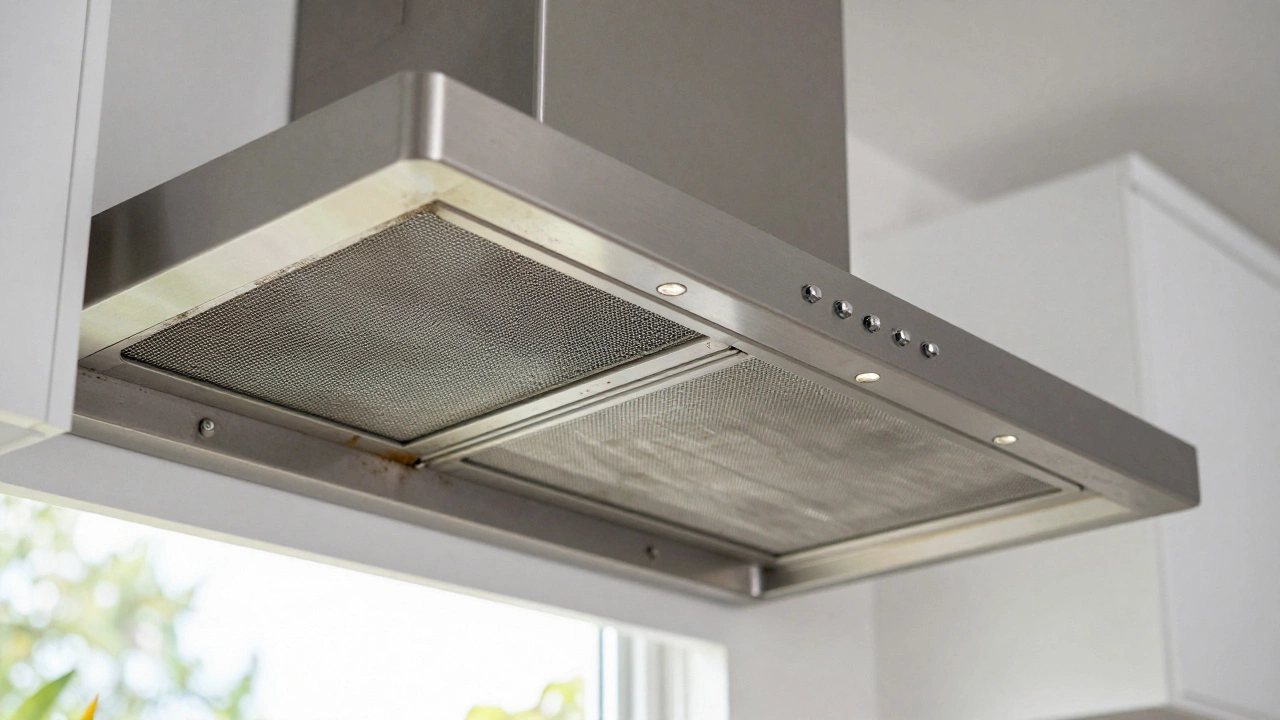
Before you buy a new unit, look closely at what you currently have. Not all extractor fans are created equal, and swapping one out isn't always a simple bolt-for-bolt exchange. You need to identify three key things: the mounting style, the power connection, and the ventilation path.
Most modern kitchens use one of two types. Cupboard-mounted hoods sit above the stove and vent upwards, often requiring a chase in the cabinetry. Wall-mounted chimneys attach directly to the wall and extend up towards the ceiling. If you have a built-in model hidden inside your cabinetry, the installation is slightly different but follows similar principles.
Next, check how it’s powered. Does it have a standard plug that goes into a nearby socket, or is it hardwired directly into your home’s electrical system? Plug-in models are straightforward-you just unplug the old one and plug in the new one. Hardwired models involve connecting live, neutral, and earth wires. In New Zealand, working on fixed wiring without a license can be risky and potentially illegal depending on the scope of work.
Finally, trace where the air goes. Is there a flexible duct running from the back of the fan to an external wall or roof? Or does it recirculate air back into the room using carbon filters? External venting is superior for removing grease and heat, so if your current setup recirculates, consider upgrading to a ducted system while you’re at it.
Tools and Materials You’ll Need
You don’t need a full workshop to replace an extractor fan, but having the right tools makes the job safer and faster. Here’s a checklist of essentials:
- Screwdriver set: Both Phillips head and flathead drivers for removing screws and accessing tight spaces.
- Drill and bits: For creating new mounting holes if the new fan doesn’t align with the old ones.
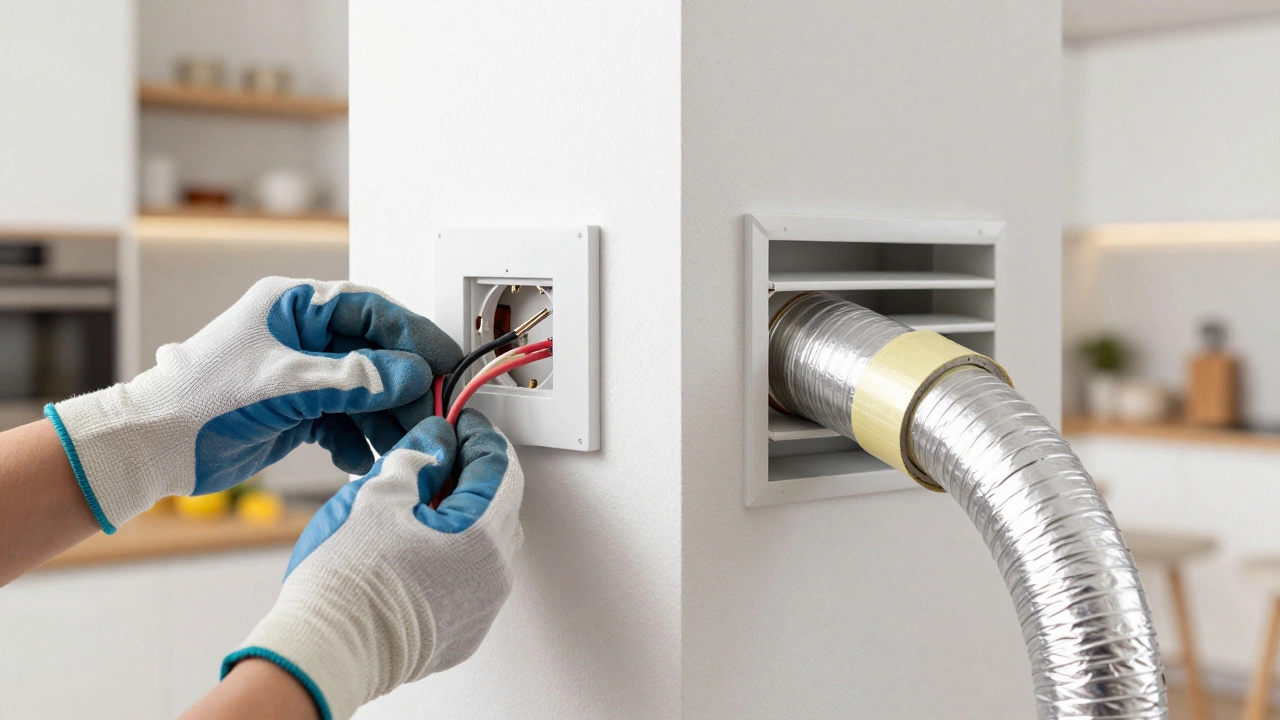
- Wire strippers and connectors: Essential if you’re dealing with hardwired connections. Use proper Wago connectors or screw terminals rather than tape.
- Measuring tape: To verify cutout dimensions and ducting length.
- Ladder: A sturdy step ladder to reach the upper cabinets safely.
- Multi-meter: To confirm that power is truly off before you touch any wires.
- New extractor fan: Ensure it matches your existing duct size (usually 120mm or 150mm diameter).
If you’re replacing a ducted fan, you might also need some aluminum foil tape to seal joints. Never use standard masking tape-it won’t hold up against suction and heat.

Step-by-Step Replacement Process
Once you’ve gathered your tools and confirmed compatibility, it’s time to begin. Follow these steps carefully to avoid damage or injury.
- Isolate the power: Turn off the circuit breaker for your kitchen at the main switchboard. Use your multi-meter to test the wires behind the old fan and ensure there is no voltage present.
- Remove the old fan: Unscrew the mounting brackets holding the unit in place. Disconnect the electrical wires-take a photo first so you remember which wire went where. Detach the ducting from the rear of the fan.
- Prepare the area: Clean the mounting surface thoroughly. Grease buildup can prevent the new fan from sitting flush. Check the ducting for blockages or tears; replace it if necessary.
- Install the new fan: Hold the new unit in place and mark the drilling points. Drill pilot holes and secure the fan using the provided screws. If the new fan has a different shape, you may need to use spacers or shims to keep it level.
- Connect the wiring: Match the live (brown), neutral (blue), and earth (green/yellow) wires from your house supply to the corresponding terminals on the new fan. Tighten the connections securely.
- Attach the ducting: Connect the flexible duct to the exhaust port of the new fan. Seal the joint with aluminum tape to prevent air leaks.
- Test the unit: Turn the power back on at the switchboard. Switch on the fan and check for unusual noises or vibrations. Test the light function if applicable.
If everything runs smoothly, you’re done. If the fan rattles, recheck the mounting screws and ducting connections. Loose parts are the most common cause of post-installation noise.
When to Call a Professional
While many homeowners successfully swap out their own extractor fans, there are scenarios where hiring a pro is the smarter move. Understanding these boundaries protects your home and keeps you compliant with local laws.
| Scenario | DIY Feasibility | Risk Level |
|---|---|---|
| Plug-in model replacement | High | Low |
| Hardwired model swap | Medium | Medium |
| New ducting run required | Low | High |
| Electrical circuit modification | Not Allowed | Very High |
In New Zealand, the Electricity Safety Act 1998 regulates who can perform electrical work. While minor repairs like replacing a plug or fuse are generally permitted for homeowners, installing new fixed wiring or modifying circuits usually requires a Licensed Electrician. If your new extractor fan needs a dedicated circuit or if you’re unsure about the condition of your existing wiring, pay for a professional inspection.
Additionally, if your kitchen layout changes-for example, moving the stove to a different location-you’ll likely need to reroute ducting through walls or ceilings. This involves carpentry and potentially structural considerations that go beyond simple appliance replacement.
Maintenance Tips to Extend Lifespan
Replacing your fan is only half the battle. Keeping it clean ensures it continues to work efficiently for years. Grease accumulation reduces airflow and strains the motor, leading to premature failure.
Clean the metal mesh filters every two weeks by soaking them in warm, soapy water. For stubborn grease, use a degreaser spray. Charcoal filters, if used, should be replaced every three to six months depending on usage frequency. Don’t forget to wipe down the exterior glass or stainless steel surface regularly to maintain its appearance.
Check the ducting annually for bird nests or debris, especially if the exit point is on the roof. Blocked ducts force the motor to work harder, increasing energy consumption and noise levels. A quick visual inspection can save you from costly repairs down the line.
Frequently Asked Questions
Do I need a licensed electrician to replace my extractor fan in New Zealand?
If you are simply swapping an existing hardwired fan with another hardwired fan using the same electrical connection, you may do this yourself. However, if you need to install new wiring, create a new circuit, or modify the switchboard, you must hire a licensed electrician to comply with NZ Electrical Safety Regulations.
Can I convert a recirculating fan to a ducted one?
It depends on the model. Some extractor fans are convertible, meaning they come with both charcoal filters and a duct outlet. Check your user manual. If your current fan is not convertible, you will need to purchase a new ducted model and install appropriate ducting to the outside.
What size ducting should I use for my extractor fan?
The most common duct sizes for residential kitchen fans are 120mm and 150mm in diameter. Measure the exhaust port on your new fan to determine the correct size. Using a smaller duct than recommended restricts airflow and reduces efficiency.
How long does it take to replace a kitchen extractor fan?
For a straightforward swap where the mounting points and ducting already exist, expect the job to take between 1 to 2 hours. If you need to drill new holes, extend ducting, or troubleshoot electrical issues, it could take longer.
Why is my new extractor fan making a buzzing noise?
Buzzing is often caused by loose mounting screws, vibrating ductwork, or foreign objects inside the fan blades. Check all connections and ensure the ducting is secured tightly with tape. If the noise persists, the motor bearings might be defective, and you may need to return the unit.

