You've got a batch of cookies to bake, but something's not right with your oven. If the element's acting up, it might be time to figure out if it's bad. Some signs to keep an eye out for include uneven cooking or visible damage, like cracks or blistering on the element. These could be telling you it's on its last legs.
Start with a little detective work on your own. Give it a quick visual inspection. You don't need any fancy tools to see if there's significant wear and tear. But if you're up for some DIY testing, a multimeter can help you check if it's still getting power. Just remember to stay safe and turn off the electricity before you start poking around.
If you pinpoint the problem and it screams 'replacement,' don't stress. Swapping out an electric element is not as drastic as it sounds, and you'll have your trusty oven back in no time. But if things seem over your head, never hesitate to call in a pro. They can save you tons of headaches with their expertise.
- Signs Your Oven Element Is Failing
- Conduct a Visual Inspection
- Test the Element with a Multimeter
- Replacing a Faulty Element
- Safety Precautions You Should Know
- When to Call a Professional
Signs Your Oven Element Is Failing
So, how do you know if your electric oven element is letting you down? There are a few clear signs that point to a failing component, and catching them early can save your baking day.
1. Uneven Cooking
Have you noticed some parts of your food are overcooked while others are barely warm? This is a classic signal that something's up with the element. When it doesn’t heat evenly, your oven’s performance drops significantly.
2. Visible Damage
Take a good look at your oven’s element. If you spot any blistering, cracking, or even burn marks, these are red flags. Such damage isn't just cosmetic; it can impact how well the element heats up.
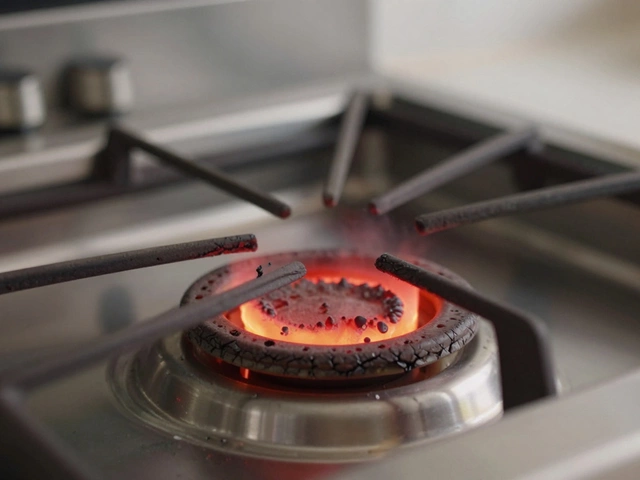
3. The Element Isn’t Glowing
When an oven’s working fine, the element usually glows red-hot when it’s on. If yours isn’t glowing or is doing so inconsistently, it’s probably not heating as it should. This is another sign the element could be bad.
4. Strange Noises
Listen up! If your oven’s making strange buzzing or popping noises, those could be cries for help from the element. Sound changes often indicate something’s not functioning correctly.
5. Delayed Heating
If preheating takes forever, don’t blame your recipe just yet. A sluggish heat-up is a common symptom of a failing element.
Knowing these warning signs not only saves you from undercooked meals but can help you prevent further damage that could be costlier down the line. Keep an eye out for these clear hints and keep your oven in its prime cooking condition!
Conduct a Visual Inspection
The first step to figuring out if your electric oven element is shot is to take a closer look. It's surprising how much you can uncover just by eyeballing it.
What to Check For
When you open your oven door, the element should look smooth and consistent. Break out the flashlight and scan for any signs of damage. What you're looking for are obvious cracks, blistering, or rough patches on the surface of the element. These are red flags indicating you might need a new one.
Sometimes, visual clues aren't as blatant. Look for discoloration; if parts of the element seem darker or burnt out, that's a sign it might not be working properly. Remember this: an element in good shape should glow bright and even when it's turned on.
Quick Tips
- Make sure the oven is off and cool before inspecting to avoid burns.
- A mirror can help you check those hard-to-see areas without a back-breaking struggle.
"A regular inspection of your oven's heating element can save you from bigger problems down the line," advises Senior Technician Jacob Thompson from Appliance Fixit.
While it might be tempting to poke or prod a suspicious-looking element, hold off. If you see something concerning, it's better to move with caution to prevent further damage or injury.
Spotting the Culprit
Once you've recognized a problem visually, it's time to troubleshoot further or consider replacing the element. Pinpointing these details early helps keep your oven in top working order and prevents the hassle of uncooked meals. Observing closely can save you both time and money down the road.
Test the Element with a Multimeter
So, you’ve done the visual once-over and it looks like your electric oven element is either the villain or the victim. What next? It’s time to whip out your multimeter, a nifty gadget for checking electrical continuity. Don’t worry if you’ve never used one because it’s easier than you might think.
Safety First
Before you get started, make sure the oven is unplugged. This isn't just advice—it’s a must! Electricity and carelessness are not friends. Double-check that the oven is completely off, and give it some time to cool down if it’s just been used.
Getting Down to Business
Okay, safety box checked, let’s move on to the fun part. Set your multimeter to the lowest resistance setting, often written as “ohms.” This is crucial for checking if your oven element is conducting electricity as it should.
- Locate the Element: Depending on whether you’re dealing with a stovetop or a separate oven, find the terminals where the element connects. They’re usually at the back or bottom.
- Disconnect the Element: Gently disconnect the element from its terminals for accurate testing. No need for brute force; a smooth wiggle usually does the trick.
- Test with the Multimeter: Touch the multimeter's probes to the element's terminals. Got a reading of zero or infinity? That’s a bad sign! It means the element isn't functioning correctly.
Interpreting the Results
Ideally, you want a reading between 10 to 40 ohms. This sweet spot suggests your oven element is in good shape. However, if the multimeter displays zero or an open loop, it screams ‘replace me now!’
If necessary, don't skimp on getting a new element. They’re usually affordable and can save you from a heap of cooking mishaps. With that done, attach the new element, reconnect everything, and you’re back in the baking action!
Replacing a Faulty Element
So, you've confirmed that your electric oven element is indeed bad. What's next? Replacing it isn't as daunting as it might seem. With some basic tools, a bit of patience, and careful attention to detail, you can have your oven back in shape.
Gather Your Tools and Supplies
Before you dive in, make sure you have everything you need:
- A replacement oven element (make sure it's the right model for your oven)
- Screwdriver
- Multimeter (if you want to double-check performance after installation)
- Safety gloves
Step-by-Step Guide to Replacing
- Safety first: Disconnect the power supply to your oven. Unplug it or turn off the circuit breaker. This step is crucial to avoid any nasty shocks.
- Access the faulty element: Open the oven door and remove the racks to get better access. The element is typically at the bottom of the oven.
- Unfasten the element: Use a screwdriver to remove any screws holding the element in place. Carefully pull out the element to expose the connected wires.
- Disconnect the wires: Take a picture of the connection for reference. Then, unplug the wires using your hands or pliers.
- Install the new element: Connect the wires to the new element just like the old one. Reference your picture to ensure a perfect match.
- Secure the element: Replace the screws to hold the new element in place.
- Test it out: Reconnect the power and test if the new element heats up properly. If you have a multimeter handy, this is a good time to double-check continuity.
James Taylor, an expert technician at Home Appliance Fixers, says,
"Replacing an oven element is often cheaper and quicker than calling out a professional for diagnostics. Just make sure to handle everything with care and follow safety protocols."
If everything looks and works correctly, you're back in business! If not, it might be wise to consult a professional to check for other issues. Keep in mind, an oven that's not working right can be more than just annoying—it can be dangerous if not repaired properly.
Now you know how to tackle a bad oven element. Hopefully, these tips will have you back to baking in no time. Happy repairing!
Safety Precautions You Should Know
Before diving into your oven repair, it's crucial to prioritize safety. Working with electricity calls for some basic but essential steps to avoid any shocks or mishaps.
Power Down
First things first, always make sure to turn off the power to your oven. This isn't just turning the oven's knob to 'off' but cutting off its power supply completely. Head to your circuit breaker and flip the switch for your oven's power source to avoid a shocking experience, literally.
Use Insulated Gloves
Even if the power is off, it's good practice to wear a pair of insulated gloves. This adds an extra layer of protection against any residual electricity and keeps your hands safe from sharp edges.
Handle Elements with Care
The electric oven element can be delicate, especially if it's cracked or damaged. When removing or inspecting it, handle it carefully to prevent any injury or creating a mess with broken pieces.
Proper Tools
Having the right tools makes a world of difference. A multimeter is handy for testing electrical consistency, but make sure it's in good condition. Using a faulty tool can create unnecessary risk.
Working Area Safety
Ensure your work area is dry, well lit, and free from clutter. Water and electricity do not mix, so your kitchen floor should be free of spills or any conductors.
| Safety Precaution | Why It's Important |
|---|---|
| Turn off Power | Prevents electrical shock |
| Wear Gloves | Protects from residual electricity |
| Handle with Care | Avoid injury from sharp parts |
| Use Proper Tools | Ensures accurate repairs |
These precautions help ensure you're protected while you take on this repair. If anything feels off or you’re unsure, it's always a good bet to call in a professional. There's no shame in getting a helping hand when safety is on the line. And remember, maintaining your oven's function safely is always the priority.
When to Call a Professional
Not every electric oven repair task is a DIY job. Sometimes, knowing when to throw in the towel and call in a professional can save you time and avoid unnecessary headaches. Here's what to look for when deciding to get expert help.
Complex Electrical Issues
If you're facing persistent electrical issues, like tripped breakers or the oven not responding at all, it's time to call in the pros. Messing with electrical wiring without expertise isn't just risky—it's downright dangerous. A professional can safely diagnose and fix the problem without the risk of electric shock or further damage.
Unfamiliar with the Process
Changing an oven element might sound simple, but it can get tricky if you're not familiar with your appliance's inner workings. If you've never done it before and the user manual looks like another language, spare yourself the frustration. Getting it done right the first time will likely save you both time and money.
Dealing with Extensive Damage
If your oven element is severely damaged—think heavy scorching or parts of it aren't even there anymore—then leave it to the professionals. They have the right tools and the know-how to replace elements cleanly, avoiding further issues down the line.
Economic Decision
Sometimes, the cost of a professional's fee is worth the peace of mind. They come with guarantees on their work, meaning if the problem persists, you have support in fixing it. Plus, you'll be free to focus on your day-to-day without stressing over how to fix your oven.
Ultimately, knowing when to call in expert help can protect your investment and keep your kitchen running smoothly. When you're in over your head, remembering these points can make that decision easier.