Extractor Fan Size Calculator
Calculate whether your extractor fan provides enough airflow for your kitchen size. Based on the rule: 10 liters per second (L/s) of airflow for every square meter of kitchen space.
If your extractor fan has suddenly gone quiet, it’s not just annoying-it’s a health risk. Without proper ventilation, grease, steam, and cooking odors build up in your kitchen, leading to mold, sticky surfaces, and even respiratory issues. You might assume the fan is broken beyond repair, but most of the time, it’s something simple. In Auckland homes, where humidity and grease buildup are common, extractor fans fail for predictable reasons. Here’s what’s likely causing yours to stop working-and how to fix it without calling a pro.
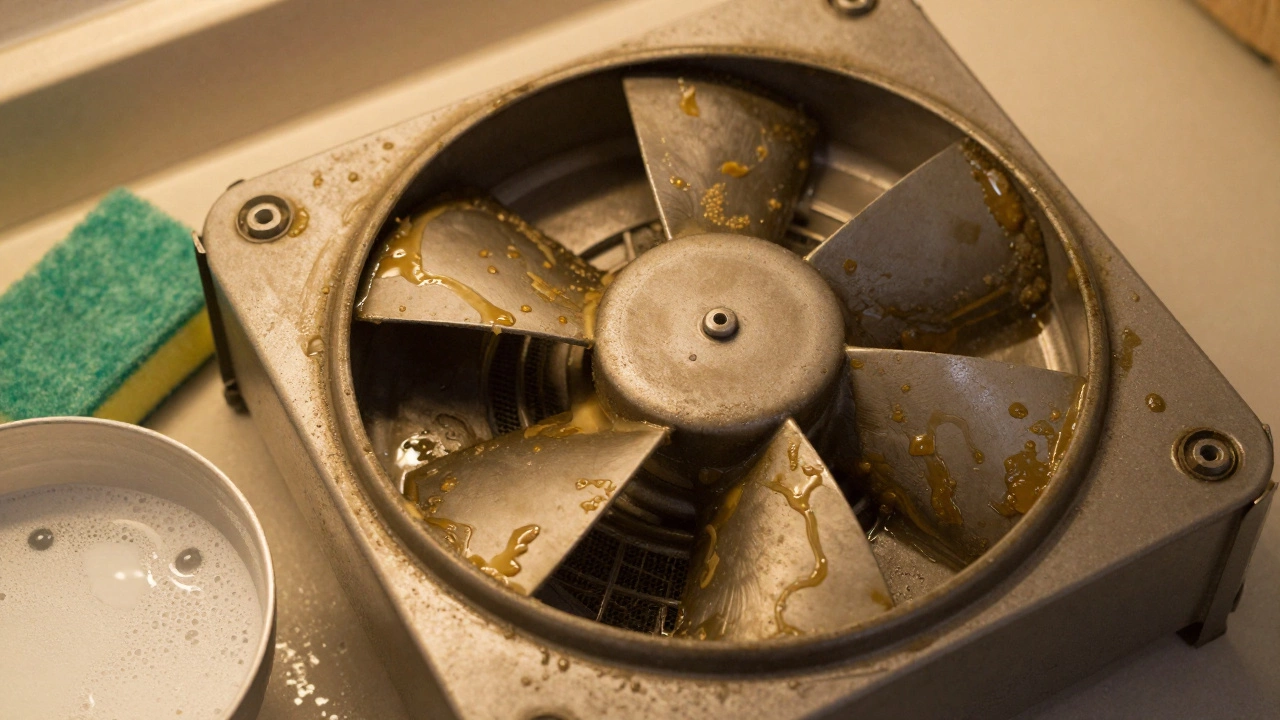
1. Dust and Grease Buildup
The most common reason an extractor fan stops working isn’t a dead motor-it’s a clogged filter or blocked blades. Over time, cooking oils, steam, and airborne particles stick to the fan blades, housing, and exhaust duct. This buildup creates drag, forcing the motor to work harder until it overheats or stalls.
In a busy kitchen, this can happen in as little as six months. You might notice the fan running louder than usual, or it only spins slowly when you turn it on. Open the fan cover (usually held by clips or screws) and inspect the blades. If they’re coated in yellowish grease, that’s your culprit.
Fix: Remove the filter and soak it in hot, soapy water for 30 minutes. Wipe down the blades and housing with a degreaser (white vinegar works well). Reassemble and test. Do this every 3-4 months to prevent future issues.
2. Faulty Motor
If the fan is clean but still silent, the motor might be failing. Motors wear out from constant use, especially in older units (over 8-10 years). You’ll know it’s the motor if you hear a faint hum when you flip the switch but no airflow. No spinning. No noise beyond the buzz.
Some motors have thermal cutouts that shut them off if they overheat. Let the fan sit unplugged for an hour, then try again. If it still doesn’t spin, the motor is likely dead. Replacing the motor is possible, but often not worth the cost unless it’s a high-end model. For budget units, replacing the whole extractor fan is cheaper and more reliable.
Check the motor’s label for the model number. You can order a direct replacement online or from a local appliance parts supplier in Auckland. Make sure the voltage and RPM match exactly.
3. Broken or Loose Wiring
Wiring issues are common in older homes, especially where extractor fans are installed above stoves. Heat, moisture, and vibrations can loosen connections over time. A frayed wire, corroded terminal, or disconnected plug can cut power without any visible damage.
To check: Turn off the power at the circuit breaker. Remove the fan cover and inspect the wiring. Look for blackened insulation, loose screws on terminals, or wires that pull out easily. If you see any damage, don’t just tape it up. Replace the wire or connector. Use heat-resistant wire rated for appliance use.
Also check the wall switch. A faulty switch can mimic a broken fan. Bypass the switch temporarily by connecting the live and switched wires directly (with power off). If the fan runs, the switch is bad. Replace it with a switch rated for fan loads (usually 10A).
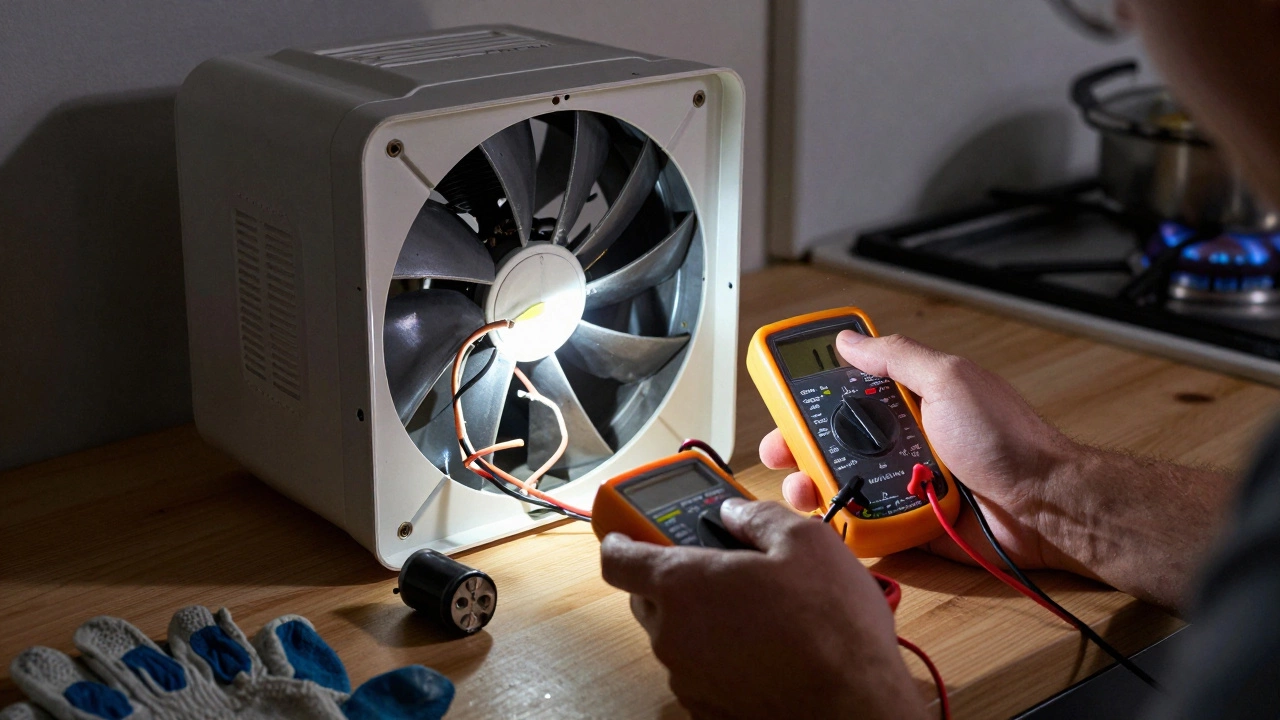
4. Faulty Capacitor
Many extractor fans use a start capacitor to give the motor the initial boost it needs to spin up. If that capacitor fails, the motor won’t turn-even if it’s still good. You might hear a low buzz or click when you turn the fan on, but nothing happens.
The capacitor is a small, cylindrical component (usually black or silver) near the motor. It looks like a tiny battery. If it’s bulging, leaking, or cracked, it’s dead. Capacitors are cheap-under $10-and easy to replace. Just take the old one to a hardware store and match the microfarad (µF) rating and voltage (usually 2.5µF-4µF, 450V).
Warning: Capacitors store electricity even when unplugged. Discharge it safely by touching both terminals with an insulated screwdriver before removing it.
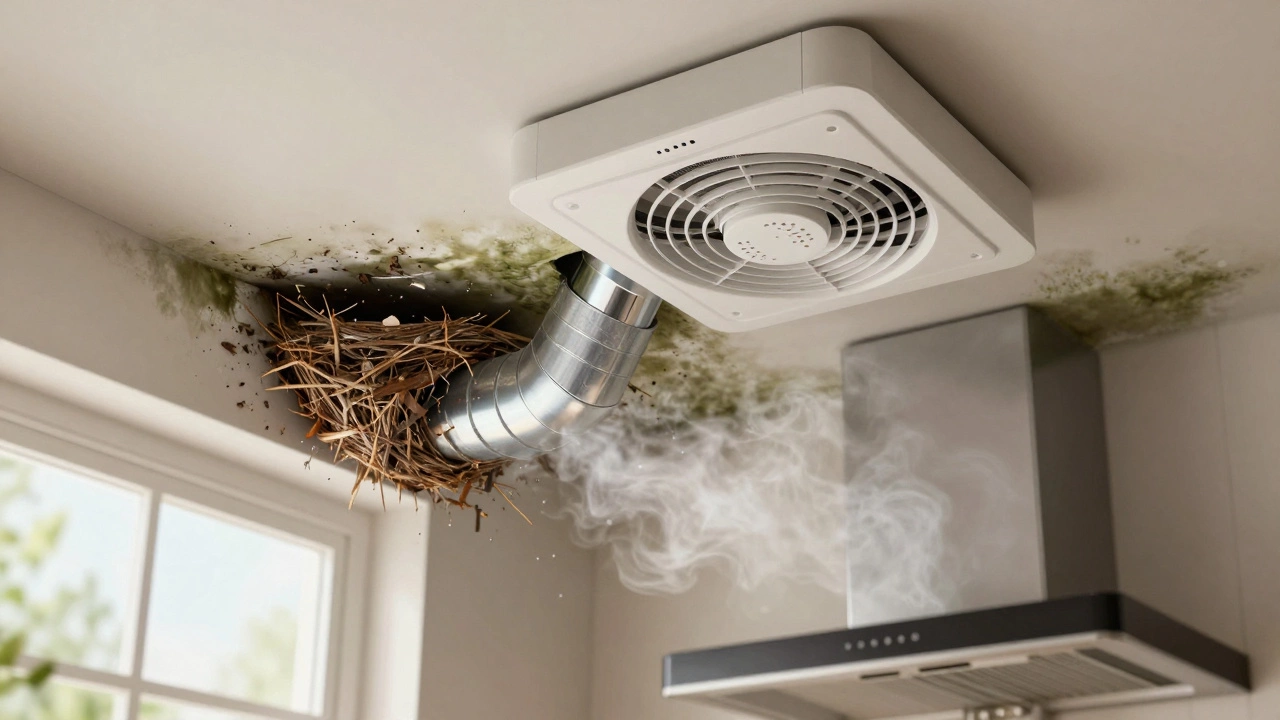
5. Blocked or Collapsed Ducting
Your extractor fan isn’t just connected to a wall-it’s connected to a duct that leads outside. If that duct is kinked, crushed, or filled with bird nests, grease, or debris, airflow stops. The fan might still run, but it won’t pull air out. That’s why your kitchen still smells like fried onions even after 20 minutes of running the fan.
Check the external vent. Is air coming out? If not, the duct is blocked. Remove the duct cover from the outside and inspect. Use a vacuum with a long nozzle or a flexible brush to clear the line. If the duct is made of flexible plastic or foil, it’s likely collapsed inside the wall. Replace it with rigid metal ducting-it lasts longer and resists grease buildup.
In Auckland’s older homes, ducts often run through the roof cavity. If you’ve had recent pest activity (rats, possums), check for nests. A blocked duct can also cause moisture to back up into your ceiling, leading to mold.
6. Incorrect Fan Size or Installation
Not every extractor fan is built for every kitchen. If your fan is too small for the room size, it’ll run constantly and burn out faster. A general rule: you need 10 liters per second (L/s) of airflow for every square meter of kitchen space. A 10m² kitchen needs at least a 100 L/s fan.
Many people install cheap, low-power fans because they’re cheaper. But they don’t last. If your fan is underpowered, no amount of cleaning will fix the problem. Check the fan’s rating label. If it’s below 80 L/s and your kitchen is over 8m², it’s the wrong unit.
Also, check the installation. If the fan is mounted upside down, or the duct has too many bends (more than two 90-degree turns), airflow is restricted. This puts extra strain on the motor and shortens its life.
7. Power Supply Issues
Before you tear apart the fan, check the basics. Is the circuit breaker tripped? Is the GFCI outlet (if it’s plugged in) reset? Sometimes the fan is wired to a light switch, and someone accidentally turned off the wrong switch.
Test the outlet with another appliance. If nothing works, check your home’s fuse box. In older homes, the extractor fan might be on a shared circuit with other kitchen appliances. Overloading can trip the breaker. If the fan is hardwired, make sure the junction box behind the wall has secure connections.
Also, if you’ve recently done any electrical work in the kitchen, a wire might have been accidentally disconnected. Even a loose neutral can cause intermittent failure.
When to Call a Professional
You can fix most extractor fan issues yourself-cleaning, capacitor replacement, wiring checks. But call a licensed electrician if:
- You’re not comfortable working with live wires
- The fan is hardwired and you can’t locate the power source
- You suspect a fault in your home’s main electrical system
- The duct runs through the roof or wall and you can’t access it safely
Electricians in Auckland typically charge $80-$120/hour for diagnostics. If they say the fan needs replacing, ask for a quote on a new unit. Many offer bundled deals-removal, disposal, and installation-for under $300.
Preventing Future Failures
Once you get your fan working again, keep it running smoothly:
- Replace or clean the grease filter every 2-3 months
- Run the fan for 15 minutes after cooking to clear lingering steam
- Don’t cover the fan with towels or curtains
- Use a timer switch so it doesn’t get forgotten
- Upgrade to a fan with a humidity sensor-it turns on automatically when steam rises
Investing in a better fan now saves money later. Look for models with brushless motors-they last twice as long and use less energy. Brands like Extract, EnviroVent, and Zephyr are reliable and available locally.
Don’t ignore a silent extractor fan. It’s not just about smells-it’s about your home’s air quality, your health, and preventing costly damage from moisture and mold. Fix it right, and it’ll serve you for years.
Why does my extractor fan make a humming noise but not spin?
A humming noise with no spinning usually means the motor is trying to start but can’t. This is often caused by a failed start capacitor, a seized motor from grease buildup, or a broken blade. Check the capacitor first-it’s the cheapest fix. If that’s fine, clean the blades thoroughly. If it still hums, the motor is likely dead and needs replacing.
Can I use my extractor fan without a filter?
You can, but you shouldn’t. Without a filter, grease and particles will clog the motor and ducting much faster. This leads to overheating, reduced airflow, and a shorter lifespan for the fan. Filters are cheap and easy to replace. Running without one is like running a car without an oil filter-it might work for a while, but it will destroy the engine.
How do I know if my extractor fan is powerful enough?
Multiply your kitchen’s square meters by 10. That’s the minimum airflow in liters per second (L/s) you need. For example, a 9m² kitchen needs at least a 90 L/s fan. If your fan is below 80 L/s and your kitchen is over 8m², it’s underpowered. Check the label on the fan or look up the model online. If it’s old or cheap, it’s probably not strong enough.
Is it safe to clean an extractor fan with water?
Yes, but only if you unplug it first and only clean removable parts like the filter and blades. Never spray water directly into the motor housing or electrical components. Use warm soapy water and a soft cloth. Let everything dry completely before reassembling. Moisture inside the motor can cause short circuits or rust.
Why does my extractor fan turn on by itself?
If your fan turns on without you touching the switch, it likely has a humidity sensor. Many modern extractors activate automatically when steam levels rise. This is normal and energy-efficient. If you didn’t install a sensor, the switch may be faulty or wired incorrectly. Check for moisture damage near the switch or call an electrician to inspect the wiring.