Something's humming, but not in a good way. You've noticed the extractor fan in the bathroom or kitchen just isn't pulling its weight anymore. Maybe the noise has shifted from a quiet purr to sounding like a tiny lawn mower in your ceiling, or the whole thing stopped pulling air altogether. You might be thinking—do I really need to buy a new fan, or can I just swap out the motor? Here's a wild stat to start: in the UK alone, more than 2.5 million extractor fans go out each year. That's a lot of fans headed for landfill, and most just need a fresh motor to live on.
Signs Your Extractor Fan Motor Needs Replacing
Fans are like silent heroes until they’re not. But how do you know it's the motor and not something simpler? If you flick the switch and nothing happens—no whir, no vibration—there's a good chance the motor's finally thrown in the towel. I've had one in our house kick the bucket after just six years; dust, steam, and grease take a toll. Sometimes the fan spins slower than it used to, which can mean tired bearings or a burnt-out coil. Listen for scraping or squealing. A burnt smell? Don’t ignore that—motors can actually overheat to the point where wires melt. Once, my wife Adele walked into the kitchen and asked whether I was roasting wires as a snack.
Electrical problems show up as flickering lights on the same circuit, or the fan randomly cutting off. If the cover is clean and there's still no airflow, the issue might be inside. Sure, sometimes a deep clean fixes things (mould is a sneaky killer of fans), but if you've dusted every fin and still no love, it’s probably time for a motor swap. It's not always the visible bits that break, either. Even new installations can have wiring go loose if something wasn’t fitted right. Trouble is, the vast majority of people throw the whole unit out, missing the chance for quick DIY maintenance.
Here’s a tip you won’t find on most YouTube tutorials: place a thin piece of tissue up to the vent; if it doesn’t even quiver when the fan’s on, things aren’t right. My neighbor down the street did this and ended up finding a tiny piece of insulation caught in the blades, but most times, no movement means electrical trouble.
What You Need to Know Before Replacing the Motor
The good news? In many extractor fans, swapping only the motor is possible, and it’ll save you money. Motors usually cost about a third of what a full new unit does, but you’ve got to get the exact right one. Manufacturers aren’t always helpful here. Sometimes they stick the motor model deep inside the fan casing, or worse, mark it as ‘exclusive’ when it’s really a standard part in disguise. If you can still see the sticker or etch on your old motor, jot down the spec codes (voltage, wattage, model number). Don’t mix and match—if your fan’s designed for a 220V motor, don’t try to shoehorn in a 110V one from your cousin’s old bathroom project.
Wiring is a whole world of its own. Modern extractor fans often have timer modules, humidistats, or speed controls. If you’re thinking, 'I’ll just stick the wires where they were,' be careful. Take a photo before you disconnect anything. I learned this the hard way—I once swapped a kitchen extractor fan’s motor while Adele was out, and she came home to every light flickering like a disco when I finished the job. Turned out, I’d mixed up the live and switched-live wires. Take your time, check the wiring diagram (they’re sometimes stuck to the inside of the cover), and test before you button it up.
Safety’s not just a throwaway line here. Mains voltage is no joke. Always switch off power at the breaker and double-check before you touch anything. A decent voltage tester costs less than a takeaway. One more thing: if your extractor’s in the bathroom, there might be special rules where you live for working near water—sometimes you need an electrician by law.
Step-by-Step: Replacing the Extractor Fan Motor
Let’s get into how you’d actually replace the motor. Here’s what you’ll need:
- A new replacement motor (same model/spec as the old one)
- Screwdriver set—flat and Phillips head
- A voltage tester
- Needle-nose pliers
- Camera/phone for wiring reference
- Maybe dust masks and gloves, depending on how gross things are in there
Before anything: turn off the power at the breaker. Don’t just flick the wall switch—those wires are still hot behind the casing. Confirm it’s dead with your voltage tester.
- Remove the fan cover and filter. Most covers pop off with a gentle push or by removing two screws.
- Take a photo of the wiring. Trust me, you’ll thank yourself later.
- Disconnect the wires feeding the motor. Remember, some fans have more than one live wire (constant and switched live).
- Undo the screws or retaining clips around the fan assembly. Most fans aren’t overly complicated, but sometimes you’ll need to wiggle the assembly out with a bit of patience.
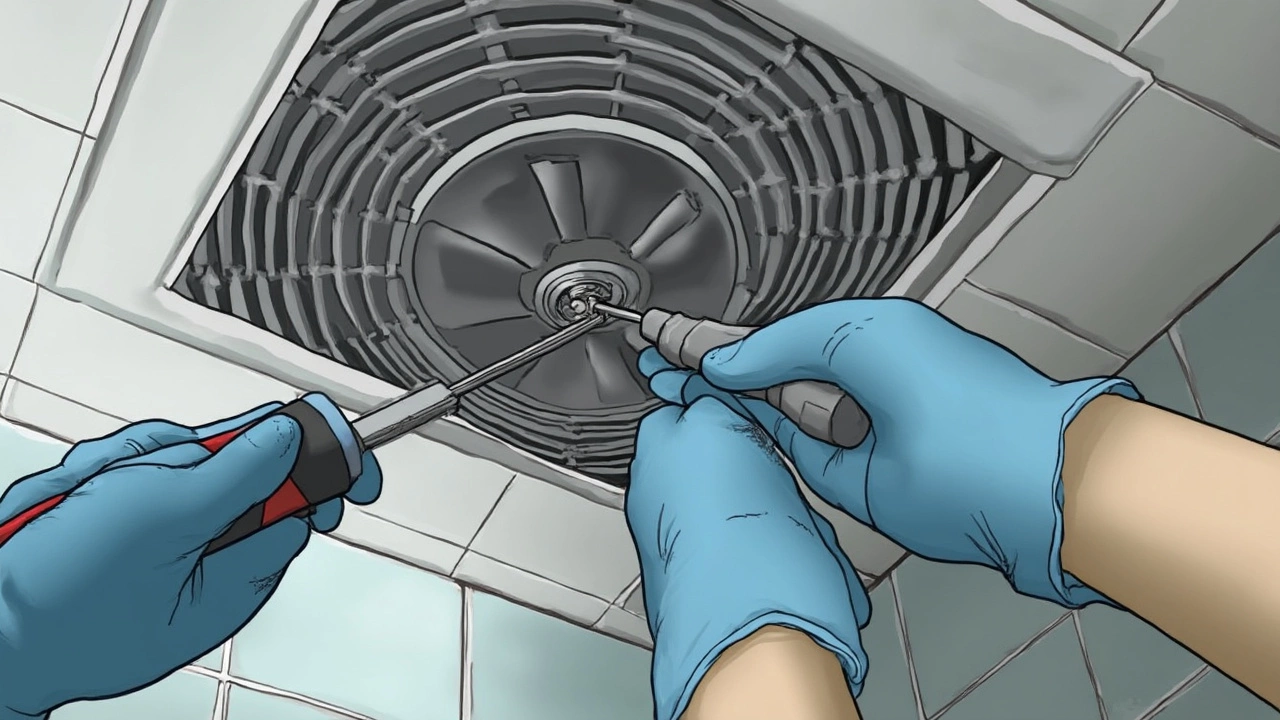
- Slide the motor out of the housing. A lot of motors are stuck in with a bit of dust and grease—if it’s stubborn, a light tap on the side usually gets it moving.
- Swap in the new motor, following any alignment marks or tabs.
- Reconnect the wires to the correct terminals. Check your photo and the labels.
- Secure the motor with the original screws or clips. Loose parts rattle, tight parts hum quietly. You want quiet.
- Refit the fan blades (if they came off) and put the cover back on.
- Restore power and test. If the fan doesn’t run smoothly or smells off, switch it off and check everything before use.
The actual time for the swap? For most fans, 30 minutes to an hour. Sometimes, if there’s a lot of old wiring or the fan’s buried deep, it can take longer. The oldest extractor motor I’ve swapped out was packed under 20 years of dust and spiderwebs—I spent more time vacuuming than replacing parts.
Extractor Fan Motor Types and Compatibility
Not all extractor fans use the same type of motor. Here’s a short breakdown of the most common types you’ll find out in the wild:
- Shaded-pole motors – These are basic, cheap, and tend to be the noisiest. Used in older or budget bathroom/kitchen fans.
- Synchronous motors – These are usually quieter and last longer.
- Brushless DC motors – The new kids in town; these are efficient, dead quiet, and found in more expensive or ‘smart’ fan models.
Matching the right type is crucial. Just because a motor fits doesn’t mean it'll work properly with your fan’s electronics or venting design. For instance, some fans with timers or humidity sensors need a certain type of motor to function correctly. If your old fan had variable speeds and your new motor only runs at one, you might lose some features. I’ve personally swapped a shaded-pole motor for a synchronous one before—but only because the manufacturer said it was compatible. When in doubt, look up the exact model of your fan and see what replacement motors work for it. Most manufacturers keep replacement part lists online, though sometimes you have to email customer service. I once waited two weeks for a reply just to find out my part wasn’t ‘officially supported,’ even though it fit.
Here’s a mini compatibility chart based on real product lines:
| Fan Brand/Model | Motor Type | Common Replacement Motor Code |
|---|---|---|
| Xpelair DX100 | Shaded-pole | MSFT14/6-1 |
| Vent-Axia Solo Plus | Synchronous | EU: 455144 |
| Envirovent SIL100T | Brushless DC | EVB100DC |
Grab the right motor and things get a lot easier. Getting it wrong usually ends up in weird noises, low airflow, or instant burnout.

When to Repair, When to Replace the Whole Fan
Just because you replace extractor fan motor doesn’t always mean you should. Here are some questions to run through:
- Is the fan body cracked, rusted, or otherwise a mess? If so, new motor or not, it’s ready for the recycling skip.
- How old is it? If you’re replacing a fan from the nineties, you’ll probably save on electricity and noise by upgrading to a newer, more efficient model.
- Do you want extra features? Newer fans often have moisture sensors, ultra-quiet settings, or smart timers you can’t get with an old motor swap.
- Price check: sometimes the cost of a new motor is almost as much as a new fan—especially in the budget end.
Personal story—our old bathroom fan sounded like a wind tunnel and cost more to run than a fridge. After the second motor packed in, I looked up the specs and realized for just £15 more, I could get a silent one with a built-in timer. That was a game-changer for us—no more arguing about who left the fan on all night, and the steam actually cleared after showers.
There’s also a matter of ductwork. If your existing ducts are dodgy, or the fan wasn’t venting properly to start, a new fan might seal things better. Of course, if your fan’s in a hard-to-reach spot (say, attic or wall cavity), getting the right part and swapping the motor is often less hassle than reworking the whole install.
Most repairs make sense when the fan housing is still solid, you like how it fits, and replacement motors are available. Not to mention the eco angle—keeping plastic and electronics out of landfill matters more than ever. But when faced with persistent electrical faults, busted grilles, or serious noise, then a fresh start makes sense.