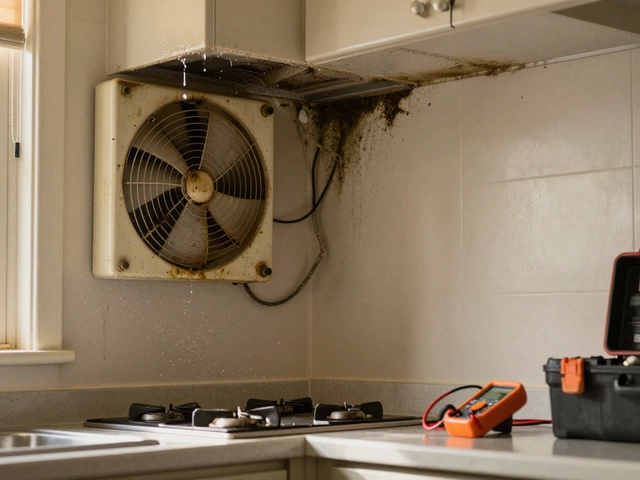
So, you've noticed that your bathroom doesn't feel as fresh as it used to, and your extractor fan seems to be just making noise without really doing much. Sound familiar? It's time to get hands-on and give that fan some much-needed servicing.
First off, why bother with this? Well, a well-maintained fan helps prevent moisture buildup—keeping mold and mildew at bay, which nobody wants sneaking into their grout lines or onto the ceiling. Plus, it'll make the room smell a lot better.
Before you roll up your sleeves, gather a few basic tools. You'll need a screwdriver, a cleaning cloth, some mild detergent, and maybe a vacuum with a brush attachment. Trust me, having these on hand will make life a heck of a lot easier. Ready? Let's walk through getting that fan working like new again.
- Why Servicing Your Extractor Fan is Crucial
- Tools You'll Need for the Job
- Step-by-Step Cleaning Process
- Common Issues and How to Fix Them
- Reassembly and Testing
- Maintenance Tips for Longevity
Why Servicing Your Extractor Fan is Crucial
Don't underestimate the role of your bathroom extractor fan. It's not just a whirring device overhead—it's a pivotal player in keeping your bathroom fresh and mold-free. Adequate air circulation is key since bathrooms tend to trap moisture, which can lead to unpleasant odors, mold growth, and even compromise your home's structural integrity over time.
According to the Indoor Air Quality Association, "Maintaining proper ventilation in your bathroom is vital to ensuring good air quality and preventing the growth of mold and mildew."
This isn't just about convenience; it's about safeguarding health. Mold and mildew can lead to pesky allergies and even respiratory issues. Keeping your fan clean and operational can save you from these unwelcome guests.
Preventing Mold and Mildew
Your fan helps remove excess moisture from showers and baths, reducing the chance for mold spores to settle in. Mold loves a damp environment, and a well-serviced fan slams the door on such conditions.
Improving Air Quality
Fans also help with odors and letting out any chemicals lingering from cleaning products. Who wants to breathe that in? Regular fan maintenance ensures that your bathroom doesn't trap these unwanted smells.
Prolonging Fan Life
Like any other mechanical device, periodic servicing extends its life. Dust and debris can clog it up, making it work harder than necessary. Let's face it, buying a new fan isn't always pocket change, so why not save a few bucks by making the one you've got last longer?
Servicing your bathroom extractor fan every six months can make a significant difference in your home's comfort and safety. It's a small task for big benefits!
Tools You'll Need for the Job
Before you start, having the right tools at hand makes a world of difference, trust me. These aren't some exotic gadgets you need to hunt down. Most of them you probably already have lying around at home.
Basic Tools
First up, a trusty screwdriver. Most extractor fans are held together with a few screws, so having a Philips or a flathead will usually do the trick. Next, grab a cleaning cloth or sponge. Something that’s gonna pick up grime without scratching up the fan surface. You’ll definitely need it.
If dust bunnies have made themselves at home inside the fan, a vacuum cleaner with a brush attachment is your best friend. It’ll help suck out all that stubborn dust without getting your hands too dirty.
Cleaning Supplies
You'll want some mild detergent, the kind you use for dishes works perfectly. It’s gentle but effective for wiping away built-up gunk without leaving residue. If you prefer to go the DIY route, a mix of vinegar and water makes a great natural cleaner.
- Screwdriver - Philips or flathead
- Cleaning cloth or sponge
- Vacuum with brush attachment
- Mild detergent or vinegar-water mix
There you have it, folks. With these basic gear, you’re more than ready to tackle the fan servicing job. A little effort goes a long way to keep those bathroom odors at bay and the air circulating properly.
Step-by-Step Cleaning Process
Alright, let's roll up our sleeves and dive into the cleaning. Keeping your bathroom extractor fan in good shape isn't rocket science. It's all about following some easy steps, and you'll be breathing cleaner air in no time.
Step 1: Power Off for Safety
Safety first, folks. Before you do anything, make sure to switch off the power to your fan. This means heading to your circuit breaker and flipping the switch. It'll keep things safe and secure while you work.
Step 2: Remove the Cover
With the power off, grab your screwdriver and carefully remove the fan cover. Most covers are attached with simple screws or spring clips. Keep those screws in a small container—you don't want them rolling away under the sink!
Step 3: Clean the Cover
The cover is often the dustiest part. Take it to a sink and wash it with mild detergent and warm water. If it's extra dusty, a vacuum brush attachment can help whisk away the build-up beforehand. Let it dry thoroughly.
Step 4: Clean the Fan Blades
- Gently wipe down the fan blades with a damp cloth. Be gentle—you don’t want to bend or damage them.
- If there's stubborn grime, a little dish soap can do wonders.
Fun fact: Did you know a dirty fan blade can reduce your fan’s efficiency by up to 30%?
Step 5: Vacuum the Surrounding Area
Dust and debris often accumulate around the fan housing. Use your vacuum cleaner with a brush attachment to get into those harder-to-reach spots.
Step 6: Reassemble and Power On
Once everything’s clean and dry, reattach the fan cover securely. Flick the breaker back on and test your fan. Does it hum with ease? You should feel some satisfaction in a job well done!
Servicing your extractor fan can make a noticeable difference in your bathroom's air quality, helping keep it fresh and free from musty odors. Repeat this simple cleaning process every six months to keep your fan ticking along nicely.
Common Issues and How to Fix Them
The bathroom extractor fan is a silent workhorse, but like all appliances, it can face some hiccups. Here are a few common issues you might encounter and how to tackle them like a pro.
1. Fan Not Turning On
This one's pretty frustrating. First, check if there's power going to the fan. It might sound basic, but make sure the circuit breaker hasn't tripped. If all's well there, it could be a blown fuse in the fan itself.
- Use a multimeter to check the power reaching the fan. No power? Call in an electrician.
- For a blown fuse, replace it. Make sure it's the right type for your model.
2. Noisy Operation
If your fan sounds like a bird stuck in it, it's probably due to the build-up of dust or loose parts. Here's what you do:
- Turn off the power. Always safety first!
- Remove the fan cover and clean out any dust or debris. A vacuum or canned air works great for this.
- Check for any loose screws that might rattle when the fan runs. Tighten them up.
3. Poor Airflow
Feeling like the fan isn't doing its job? It could be a clogged vent or dirty blades.
- First, clean the fan blades thoroughly. Dust can seriously impact performance.
- Inspect the ductwork. A blocked duct can prevent air from flowing properly. If it's clogged, clear it out.
4. Unpleasant Odors
Nobody wants a smelly bathroom. Often, odors linger because of trapped moisture or buildup in the fan or ducts.
- Regular cleaning helps here. Make it a habit to clean both the fan and ducts every 3-6 months.
- Let the fan run longer after showers to fully clear out moisture in the air.
These basic fixes can help keep your bathroom extractor fan in tip-top shape, improving air quality and extending the fan's life. Got some spare time this weekend? Why not give it a try!
Reassembly and Testing
You've cleaned the parts and fixed any issues you found, great job! Now, it's time to put everything back together and see if your efforts pay off. This part's pretty straightforward, but here's how to do it so you don't hit any snags.
Reassembling the Fan
Start by placing the fan blades back onto the motor housing, ensuring they're securely fitted. It's crucial to align everything properly. Misalignment can cause annoying vibrations or noises later. Pull out that screwdriver and start securing any screws firmly, but don’t over-tighten them or you could crack the casing.
Reattaching to the Ceiling
Once the fan unit is assembled, lift it back to its station on the ceiling. You'll likely need a step stool or ladder to do this safely. Reconnect the electrical wires. Don't worry, they should only fit one way, but if you're uncertain, reference any photos you took before disassembly (taking photos is a great pro-tip for projects like this!).
Test Run
Now, the moment of truth! Flip the switch or pull the string—does it whirl right back to life? Check for smooth operation. If it's not spinning as expected, double-check wire connections and blade installation. If everything runs smoothly, pat yourself on the back because you've just added some years to your bathroom extractor fan.
It’s worth noting: a well-serviced fan can cut down humidity significantly. Data shows that bathrooms with operational extractor fans have 30% less mold growth compared to those without. So, maintaining yours is absolutely worth it in the long run.
Final Touches
Before you call it a day, wipe down the exterior of the fan with a clean cloth to remove any fingerprints or dust from reinstallation. And there you have it—a clean, functioning fan that's ready to keep your bathroom fresh!
Maintenance Tips for Longevity
Servicing your bathroom extractor fan isn't a one-time gig. Keeping it in top shape year-round is key to a fresher bathroom. Regular maintenance not only boosts efficiency but also saves you money on big repairs or replacements.
Regular Cleaning Schedule
Set a calendar reminder to clean the fan every six months. This prevents dust and grime from building up. A quick vacuum and wipe-down takes just half an hour but makes a world of difference in air circulation.
Check the Fan's Performance
Every now and then, test the fan's performance. Is it still pulling air effectively? Hold a piece of toilet paper up to it. If it sticks, you're in good shape. If the paper falls, it might be time to inspect for blockages or even consider upgrading.
Tighten Loose Parts
Just like any other appliance, parts can loosen over time, leading to noise or reduced performance. Make it a point to periodically check and tighten any loose screws or connections. A simple twist of the screwdriver can prevent more serious issues down the line.
Pay Attention to Odd Sounds
Weird noises can indicate trouble. Listen closely every time you switch on the fan. If you hear unusual whirring or grinding, investigate or call in a pro to take a look. Early intervention can save you a lot of hassle.
Inspect the Exhaust Duct
Make sure the pathway for air to exit your home is clear. It's not just about the fan itself; the duct leading outside needs love too. Over time, obstructions like lint or dust cap obstruct airflow, causing strain on your fan.
Consider Energy-Efficient Models
If your current model is causing constant headaches despite your best efforts, it may be time to upgrade. Modern options are quieter, more efficient, and often come with self-cleaning features. If lowering your energy bills sounds appealing, doing this can be a great investment.
| Maintenance Task | Frequency |
|---|---|
| Clean Fan | Every 6 months |
| Test Performance | Every 3 months |
| Check for Loose Parts | Annually |
| Inspect Exhaust Duct | Bi-Annually |
Remember, keeping your fan in good condition isn't rocket science. With these easy steps, you extend its lifespan and keep your bathroom air fresh. It's all about small, consistent efforts that pay off in a big way.