Oven Heat Diagnostic Checker
You open the door expecting a warm roast, but instead, you get nothing but cold air. It happens right before guests arrive or when dinner is already late. An Electric Oven that fails to produce heat stops your kitchen workflow immediately. While this sounds like a disaster, the culprit is often a single component inside the machine. Most homeowners can identify the issue themselves before deciding whether to buy a part or call a professional.
This guide breaks down exactly why your appliance might stay cold and how you can safely check the hardware. We cover the most frequent failures found in residential units built between 2010 and today. By the end, you'll know if a simple switch toss-out fixes the problem or if the internal logic board needs attention.
Start With Power And Safety Checks
Before you pull any screws, verify the electricity is actually reaching the unit. It sounds obvious, but power fluctuations happen more often than people think. If the digital clock on your front panel is blank or flashing zeros, the issue likely sits outside the cooking chamber.
Go to your home's breaker box. Look for a double-pole breaker labeled 'Range,' 'Circuit 240V,' or similar. These usually handle high-voltage appliances. If the switch feels slightly loose or has tripped halfway, flip it firmly to the OFF position first, then back to ON. This resets the internal safety cut-offs that sometimes trip during power surges.
If you live in an older home or rent an apartment, check the plug behind the stove. Some models use heavy-duty cords that get unplugged accidentally during cleaning or moving furniture. A disconnected cord cuts off power to the entire system, including lights and heating coils. If you see scorch marks on the socket outlet itself, stop immediately and do not touch it-call an electrician right away.
Inspect The Heating Elements Visually
Most standard ovens rely on two primary metal tubes to generate warmth. One sits at the bottom, known as the bake element, and the other resides at the top, called the broil element. Understanding their role helps you spot damage quickly without tools.
| Component Name | Location | Primary Function | Failure Signs |
|---|---|---|---|
| Bake Element | Bottom of cavity | Baking, Roasting | Blisters, cracks, sagging red glow |
| Broil Element | Top rear wall | Browning, Broiling | No glow even on high setting |
| Conveyor Fan | Behind back panel | Distributing heat | Uneven baking, fan noise |
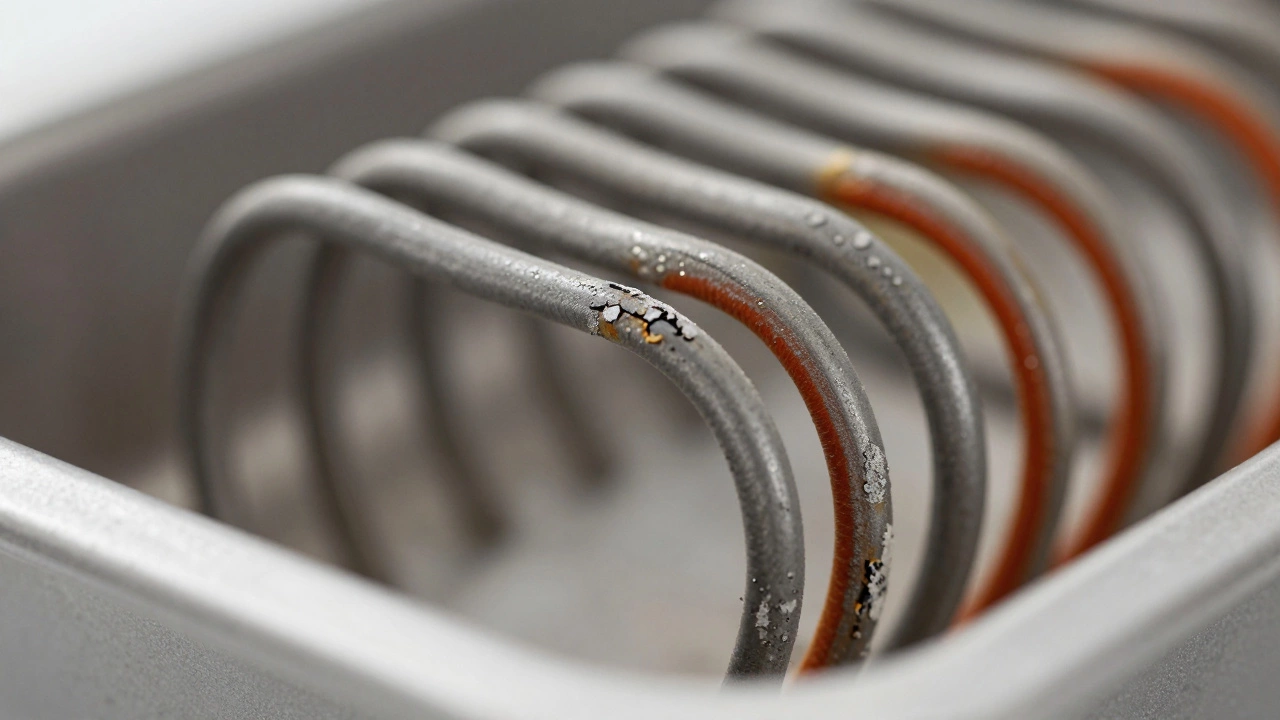
Check the bake element first. Set the oven to 350°F (175°C) and watch through the viewing window for about five minutes. You should see the bottom tube turn orange-red. If the top light glows but the tube remains grey, the coil has likely failed internally. Spots of white ash or large blisters on the metal surface indicate burnout. Even a small crack in the resistance wire stops the electrical flow, killing the heat entirely.
The broil element works differently. When set to "Broil," it should ignite almost instantly. However, because it operates at much higher temperatures, it burns out faster. If you use this function daily, expect to replace it every few years. Unlike the bake element, you cannot always see the broil coil easily from the bottom unless you remove the rack above it.
Testing Continuity With A Multimeter
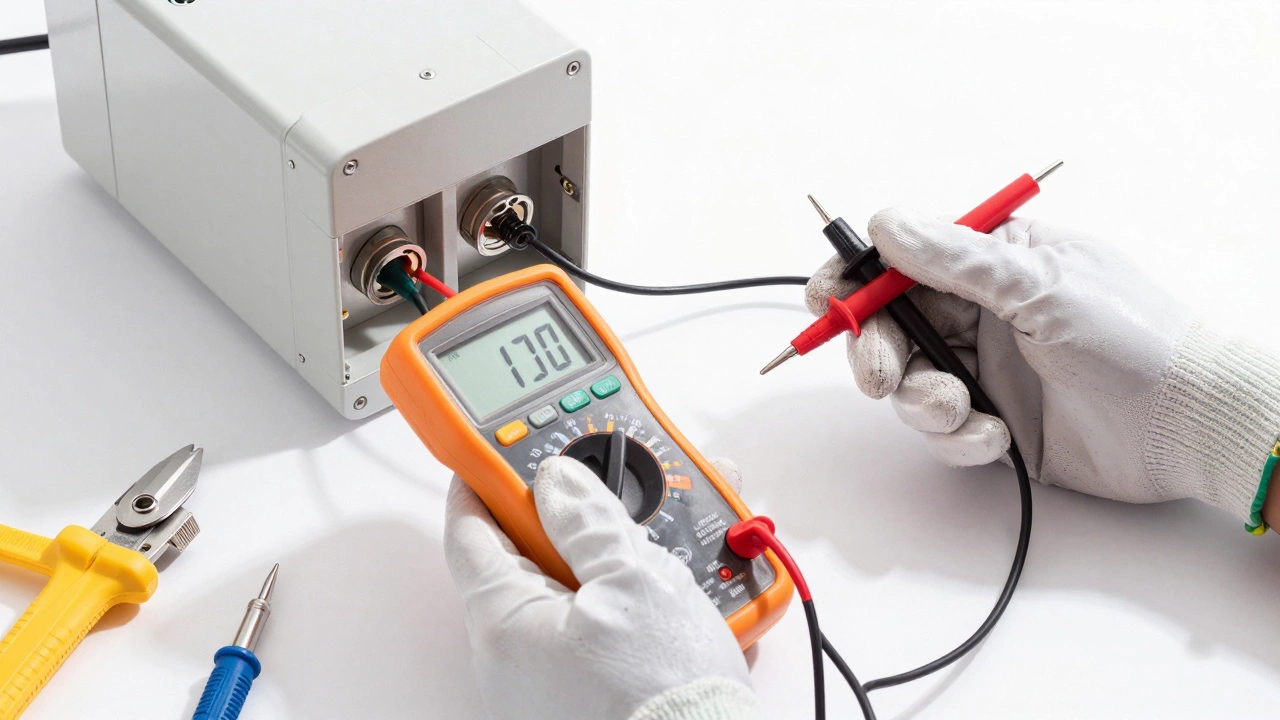
Visual checks suggest problems, but numbers confirm them. A Multimeter electrical tool used to measure voltage and continuity provides proof. Before you begin, unplug the oven completely. High voltage can kill you instantly. Wait ten minutes after cutting power to let capacitors discharge.
To test an element, you need to disconnect one of its wire leads. This exposes the terminals for measurement. Set your device to the Ohms (Ω) setting, usually represented by the omega symbol. Place one probe on the center terminal and the other on the side terminal.
A working element typically reads between 10 and 30 ohms. This range varies slightly by wattage, so consult your manual if possible. If the meter shows infinite resistance (often displayed as "OL" or "1" on digital screens), the circuit is broken inside the coil. Air gaps within the metal filament prevent current flow. In this case, you need a direct replacement.
Do not skip the ground check. Touch one probe to the metal mounting bracket or a screw hole near the wires. Readings here should also show zero continuity. If you find continuity between the wires and the ground, you have a dangerous short circuit. Using the oven in this state could cause a fire hazard.
Temperature Sensor Failures
Sometimes the oven thinks it is hot when it isn't. The temperature sensor acts like a thermometer attached to the back wall. It sends data to the computer controlling the power. If this Thermostat device regulating oven temperature malfunctions, it tricks the system into cutting power too early.
Run the oven to preheat and check the actual temperature with an independent kitchen thermometer placed inside the rack. Wait twenty minutes. If the reading is wildly inaccurate (more than 25 degrees difference), the sensor is suspect. Replacing a sensor is easier than changing elements, but it requires accessing the rear interior panel. Cleanliness matters here. Grease buildup on the probe tip insulates it from accurate air temperature readings.
Newer models utilize electronic thermal fuses. These protect the control board from overheating. They are one-time use devices. Once blown, they cannot be reset. If the fuse has tripped, usually due to a blocked vent or bad cooling fan, the oven will not run until you replace it. Look for signs of melting around the sensor housing near the upper back wall.
Control Boards And Electronic Logic
Modern ranges often hide complexity behind a sleek touchscreen or dial interface. The main Control Board electronic circuit driving oven functions dictates when heat turns on. This component manages the signals sent to relays.
If your display works perfectly but the heating cycles never engage, look for signs of arcing on the board itself. Small charred spots or popped capacitors (bulging cylinders) indicate failure. Moisture intrusion is another silent killer. Steam rising from boiling pots eventually seeps into the control area behind the panel. Cleaning with a damp cloth can accidentally drive liquid deeper.
When replacing a board, note that manufacturers program chips uniquely for serial numbers. Universal replacements rarely work. Ordering parts must match the exact model code listed on the rating sticker inside the door frame. If you cannot find a matching chip, buying a refurbished OEM unit saves money versus a brand-new upgrade.
Gas Ovens Require Different Checks
The title specifically mentions "no heat," which points strongly toward electric models. However, if you have a dual-fuel or gas range, the process changes significantly. Gas units rely on igniters to spark the flame.
In a gas oven, the heating element is replaced by a gas valve and burner assembly. Listen for the clicking sound of the igniter. If you hear clicks but no flame, the gas supply may be shut off or the thermocouple safety mechanism is preventing flow. Never force the gas valve open. If the igniter glows weakly orange instead of bright white, it lacks enough amperage to open the safety solenoid.
Deciding Between DIY And Professional Help
There are limits to home troubleshooting. Dealing with 240-volt lines requires experience. If the wiring harness itself is melted, running a new line involves pulling cable through walls. This task belongs to certified technicians.
Consider the age of your appliance. If the oven is over ten years old, the cost of parts plus labor might exceed half the price of a new unit. Manufacturers often phase out support for very old models, making finding exact spares difficult. Calculate the repair ratio: if parts plus estimated labor time equal $400, shopping for a new appliance becomes the smarter financial move.
On the other hand, a simple heating element costs less than $50 and installs in thirty minutes with a screwdriver. The peace of mind knowing you fixed it yourself is worth the effort. Just remember: safety comes before savings. Always disconnect power before touching internals.
Maintenance Tips To Prevent Future Issues
Prevention is easier than repair. Keep the door seals clean. Gummed-up rubber gaskets let heat escape, forcing the elements to work harder and burn out sooner. Wipe spills immediately while they are wet. Sugary residues carbonize at high temperatures, creating permanent stains that act as insulators on heating surfaces.
Ventilation is critical. Do not stack paper towels or boxes directly under the oven console. Overheating the electronic controls triggers the safety fuses permanently. Clean the grease trap filter behind the broil pan every month. Blocked vents restrict airflow designed to cool the electronics.
Frequently Asked Questions
Is it safe to continue using an oven that doesn't heat?
It depends on the cause. If the issue is just a burnt element, the rest of the oven might still function safely. However, if there is a smell of burning plastic or smoke, stop using it immediately. Electrical shorts can start fires.
How much does a heating element replacement cost?
The part itself usually costs between $40 and $80 depending on the brand. If you hire a technician, add another $100 to $150 for labor. Total repair bills average around $200 if you pay someone else to do it.
Can a tripped breaker cause uneven heating?
A tripped breaker typically kills all power completely. Uneven heating usually stems from a failing thermostat or a defective bake element that is partially working but losing efficiency.
Do I need special tools to change the part?
You generally only need a standard Phillips head screwdriver and needle-nose pliers. For diagnostic certainty, having a multimeter helps you confirm the old part was actually broken before buying a new one.
Will resetting the breaker fix the heat issue permanently?
Resetting the breaker solves the problem only if the breaker tripped due to a temporary surge. If the breaker trips again immediately, there is an underlying fault in the appliance or household wiring that needs fixing.